Installing OpenSSL library on macOS Catalina
Whether you are building apps for just macOS or for cross-platform, if your app is using OpenSSL for crypto-works, you will have to install OpenSSL library since macOS ships with LibreSSL. Furthermore, cross-platform cryptography in .Net Core and .Net 5 uses OpenSSL on macOS.
Installing OpenSSL library on macOS seems easy at first, but in practice can be a real pain in the back. Here is my journey of installing OpenSSL 1.1.1g on macOS Catalina (10.15.6) and making it reachable by my .Net Core apps. I tried to write complete and generalized instructions to be as applicable to more systems as possible. And I also avoided symbolic linking (ln -s) and install_name_tool, since for me those are last options.
Installing OpenSSL
First, open a terminal, and see if OpenSSL is already installed:
brew info opensslIf it’s not installed, you’ll see “Not installed” among the first few lines of output. Or may be it’s not the latest version. So, install or update if necessary:
brew install openssl
#or#
brew upgrade openssl
Check if the system sees the library directly:
openssl version -aThis command prints the SSL library which exists first in the PATH environment variable, being LibreSSL or OpenSSL at some version. OpenSSL doesn’t need being here to be reachable. But if you want this for some reason, follow the instructions below, otherwise jump to the Making OpenSSL Reachable section.
Run the command “brew info openssl” again:

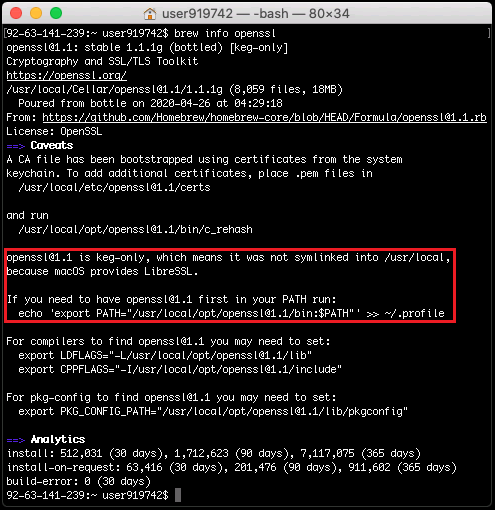
Since OpenSSL is keg-only [1], it has to be referred from an environment variable, which is done by the printed instruction, which is the echo ‘export… line in the red rectangle at above screenshot. It may be a bit different in your system, it’s because it depends on its version. Copy/paste/run that line, so that necessary command will be written to .profile file [2].
To see what is written to .profile file, if you wonder, run below command at home directory:
nano .profileManually run the .profile file to eliminate logoff & logon at this time:
source ~/.profileCheck if system sees it now:
openssl version -aIt should now print the up-to-date OpenSSL.

Making OpenSSL Reachable
When an app wants to use a library, macOS searches several locations to find it. We have to find library path of OpenSSL and add it to DYLD_LIBRARY_PATH environment variable. For this purpose, run “brew info openssl” command again.

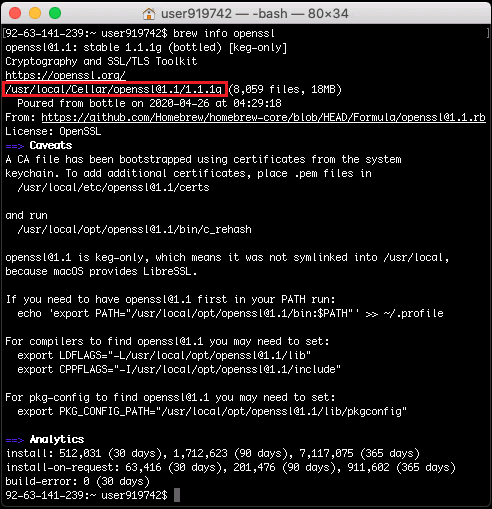
The path in the red rectangle at above screenshot is the path where OpenSSL is installed. To have the library path we’re looking for, just append /lib to it. We want this library path to be added to aforementioned environment variable at every user logon. And we’ll use below command for this, just replace the …/lib path with the one you have.
echo 'export DYLD_LIBRARY_PATH="/usr/local/Cellar/openssl@1.1/1.1.1g/lib:$DYLD_LIBRARY_PATH"' >> ~/.profileManually run the .profile file [2] to eliminate logoff & logon at this time:
source ~/.profileThis should do the trick normally. But I’ve read that on some systems apps still cannot find OpenSSL library. So, try running your OpenSSL app. If the app gives an error like “No usable version of libssl was found. Abort trap: 6” or “PlatformNotSupportedException”, you may have to install or update libssh2. I didn’t need it but here it is:
brew install libssh2
#or#
brew upgrade libssh2
Since libssh2 is not keg-only [1], it will be readily accessible without adding it to any environment variable.
That’s it! Now OpenSSL library should be reachable from any app. At least that’s the common hope 😊 This was not the funniest thing I did so far, but it was necessary. And I wrote it down here to be a reference for everyone.
I wish you installations funnier than this one 😁 Now I need some beer 🍺
Happy OpenSSLing!
Note [1]: For a software via brew to be “keg-only” means it is installed in /usr/local/Cellar but not linked into places like /usr/local/bin, /usr/local/lib. This means most tools will not find it.
Note [2]: .profile file (or .bash_profile, .bash_login) is something similar to autoexec.bat on Windows. Bash looks for it, and reads and executes commands in it, at user’s every logon.


